Thanksgiving Dinner

I will start this post by saying that I am Dominican, and in the Dominican Republic we do not celebrate Thanksgiving, officially at least, however some families have adopted this tradition here for whatever reason, either they lived in the states and they brought it along with them (my case), they just want to say thanks (my case too), they are from the US and live here, etc. We (Dominicans) never skip a good opportunity to get together with loved ones and give thanks, because we are blessed and happy.

For me it’s tradition, it started with just me and my mom eating some store bought turkey and mashed potatoes but after I got married I wanted to include my husbands family in the mix and it has just made it better, we have such a great time, we talk and laugh and I get to craft, cook and watch my loved ones get stuffed up! (pun intended).

This year I went with more of a rustic simple theme. I used burlap, walnuts and small (fake) pumpkins to dress my table up.

IMG_5958

I made some napkins and cutlery holders with burlap.

IMG_20141128_210107

IMG_20141128_210242 IMG_5961

The appetizers were my favorite, I went all out this year and since we were only 10 I splurged on some Shrimp, I made Shrimp Ceviche and Bacon Chicken Bites, my sister in law brought her delicious hummus. It was lovely. I made those small signs using a white pencil to simulate chalk.

IMG_5953 IMG_5952 IMG_5950 IMG_5956

The menu was Turkey Breast, Potato Casserole, Baked Spaghetti with Broccoli, Confetti Corn, stuffing and Cranberry Sauce.

IMG_5965

For dessert I made Apple Pie and Brownie, served with vanilla icecream of course.

IMG_5969 (1)

I had a lovely time planning this and seeing it all work out. I have had a rough year but I have so much to be grateful for and it was a beautiful evening.

I hope you had a great time with you family and/or friends!

PS. Special thanks to my hubby and my cousin Patricia Hane for the pictures, she is an amazing designer, follow her on Instagram.

Patricia Pink n Hot Chocolate

Thanksgiving

Hey Guys!

I am working on some great crafts and recipes for thanksgiving, will post soon!!

35094-Happy-Thanksgiving-Clipart

Patricia Pink n Hot Chocolate

Oreo Crumb Cheesecake

Who doesn’t love cheesecake!!! This is the 3rd time in my whole life that I’ve made a cheesecake.  First time I was like 14, I don’t even remember, I think it was a recipe from a Philadelphia Cream Cheese package and I think it came out Ok.  My second time was about 2 weeks ago –disaster.  I had to polish this recipe up and practice and now I have perfection! This has no Oreos in the cheesecake mix, however I reserved some to sprinkle over the top to give it an extra crunch.

Oreo Cheesecake

Oreo Crumb Cheesecake – Serves 8 or 12

Ingredients:

For the Oreo Crust:

  • 48 Oreo Cookies with the cream removed*
  • 1 Stick of Unsalted Butter Melted
  • 1 Tablespoon of Sugar
  • Pinch of Salt

For the Cheesecake:

  • 5 8oz Bars of Cream Cheese
  • 1 Cup of Sour Cream
  • 1 1/2 Cup of Sugar
  • 4 Eggs
  • 1 Tsp. of Vanilla Extract
  • 1 Tsp. of Salt
  • 1/4 Cup of Flour

Preparation:

Preheat the oven to 325 degrees, wrap the outside of a spring from pan with aluminum foil (10×3¨), spray it with nonstick cooking spray and set aside.

In a food processor or a blender, process the Oreos until they are finely crushed (reserve 1/4 cup of crumbs for the top), mix with melted butter, sugar and salt until it resembles wet sand, press down into prepared spring form pan and pop into the fridge while you prepare the cheesecake mix.

In a big bowl, mix with a wooden spoon cream cheese, sour cream, sugar, eggs (lightly beaten), vanilla, salt and flour.  Once it is all combined,  mix together with an electric mixer until it is soft and silky. Pour the mixture over your crust and bake for 1 hour and 15-30 minutes; it must look golden in the edges and lighter in the middle.

Cool completely and once it is cooled pop in the fridge overnight.

The next day use the 1/4 cup of crumbs to sprinkle on top to give it an extra crunch and to cover up any cracks. (it will be our little secret)

Serve and enjoy!

Oreo Cookie Crust

Cheesecake

Yes. It over browned a little (probably too much) on a side, you see my oven has issues, it over heats in the back and I forgot to turn it around, but come on!!! It’s homemade, so it’s not a big deal right!?

Cheesecake done

Cheesecake Oreo

Cheesecake de Galleticas Oreo Serves 8 or 12

Ingredientes:

Para la base:

  • 48 Galletas Oreos sin el relleno de Crema
  • 1 Barra de Mantequilla sin Sal
  • 1 Cucharada de Azúcar
  • Pizca de Sal

Para el relleno del Cheesecake:

  • 5 8oz Barras de Queso Crema
  • 1 Taza de Crema Agria
  • 1 1/2 Taza de Azúcar Blanca
  • 4 Huevos
  • 1 Cucharadita de Extracto de Vainilla
  • 1 Cucharadita de Sal
  • 1/4 Taza de Harina

Preparación:

Precalentar el horno a 325 grados, envuelva la parte de afuera de su molde desmontable con papel de aluminio, engrasar la parte de adentro ligeramente, dejar a un lado.

En un procesador de alimentos o una licuadora procesar las galleticas oreos hasta que estén finamente molidas (reservar 1/4 de taza para la parte de arriba del cheesecake), mezclar las galletas con la mantequilla, el azúcar y la sal hasta que parezca arena mojada, verter en el molde y presionar con la mano hasta que este uniforme en la parte de abajo, refrigerar.

En un recipiente grande mezclar con una cuchara de madera el queso crema, la crema agria, el azúcar, los huevos, la vainilla y la sal hasta que esté combinado.  Luego batir con una batidora de mano hasta que se incorpore bien y se vea suave la mezcla, homogénea.  Verter la mezcla sobre el molde sobre la base de Oreos, nivelar. Hornear por 1 hora 15-30 minutos hasta que los bordes estén dorados y este más claro en el centro.

Patricia Pink n Hot Chocolate

Eclairs with Chocolate Ganache

Eclairs

So you know when you see these in a bakery and you think yep I need to attend culinary school to make these, well ladies and gentleman no you don’t! These are much simpler than they look, and pretty delicious. They are light fluffy and not too sweet so that it is overpowering. I had an excitement burst when these came out of the oven, yelling and jumping up and down!! I hope these turn out great for you as well!!

Eclairs with Chocolate Ganache – Makes 20-24

Ingredients:

For Dough:

  • 1 Cup of Water
  • 1 Cup of Flour
  • 1/2 Tsp Salt
  • 1 Stick of Unsalted Butter
  • 4 Eggs

For Cream Filling:

  • 1 Cup of Heavy Cream
  • 1 1/4 Cup of Low Fat Milk
  • 1/4 Cup of Corn Starch
  • 1/4 Cup of Sugar
  • 3 Egg Yolks
  • 1 Tsp of Vanilla Extract
  • Pinch of Salt

For Chocolate Ganache:

  • 4 Oz Semi Sweet Chocolate Chips
  • 1/4 Cup of Heavy Cream

Preparation:

Cream: Mix all the cream filling ingredients in a saucepan (heat off) with a whisk to combine, once everything is mixed turn medium heat on, stir constantly until the custard thickens. Strain it to remove lumps. Cover the custard with plastic wrap and make sure that plastic is touching the custard (it prevents it from forming a skin), put it in the fridge to cool and set.

Preheat the over to 425 degrees.  Line 2 baking sheets with parchment paper and spray some oil, set aside.

Dough: Boil the water with the butter and salt, remove from the heat and add the flour all at once, mix well with a wooden spoon and return to the heat (medium). Cook, stirring constantly until it reaches a smooth homogeanic consistency.

In a large bowl add the flour mixture, let cool until warm. Add eggs one at a time stiring until completely incorporated, dough will look silky but firm. Fill a piping bag fitted with a large round or cut a large round whole from a disposable bag. Pipe out 4-6 inch logs a few inches apart onto the prepared sheet. Pipe rounds 2 inches wide on to the other prepared sheet.

Bake until golden brown, set aside and allow to cool completely.

For the ganache warm the heavy cream until it simmers and pour over the chocolate chips and let sit for 5 monutes.  Whisk until it becomes creamy.

When you are ready to assemble fill a pipping with the cream using a small to medium tip, fill each shell or profiterol and then dips the tops in the melted chocolate.

Let them set for a few minutes then serve and enjoy!

Eclairs Dough

pipping bag

Into the oven
Custard
Eclairs Ready
Ganache
Eclairs Done


Eclairs con Ganache de Chocolate –  Da para 20-24

Ingredientes:

Para la masa:

  • 1 Taza de Agua
  • 1 Taza de Harina
  • 1/2 Cucharadita de Sal
  • 1 Barra de Mantequilla sin Sal
  • 4 Huevos

Para la Crema:

  • 1 Taza de Crema de la Leche
  • 1 1/4 Taza de Leche Descremada
  • 1/4 Taza de Maicena
  • 1/4 Taza de Azúcar
  • 3 Yemas de Huevos
  • 1 Cucharadita de Vainilla
  • Pizca de Sal

Para el Ganache de Chocolate:

  • 4 Oz de Chocolate Chips Semi-Dulces
  • 1/4 Taza de Crema de Leche

Preparación:

Crema: Mezlca todos los ingredientes de la crema en una ollita con el fuego apagado, luego prende el fuego mediano y mover constantemente hasta que se espese la mezlca.  Cuando esté espeso, colar para remover grumos, echar en un recipiente y cubrir con un plástico, el plástico debe tocar la superficie de la crema para que no se endurezca la parte de arriba, refrigerar para que se ponga de la consistencia correcta.

Precalentar el horno a 425 grados, cubrir dos bandejas de hornear con papel encerado y engrasar el papel ligeramente.

Masa: Hervir el agua con la mantequilla y la sal, remover del fuego y echar toda la harina de un golpe. Mezclar bien con una cuchara de madera, volver al fuego medio y cocinar sin dejar de mover hasta que logre una consistencia homogénea.

En un bowl grande agregar la mezcla de la harina, cuando este tibia agregar los huevos uno por uno, mezclar hasta que la masa esté incorporada y se vea sedosa. Llenar una manga pastelera con la punta ancha, en la bandeja formar lineas gruesas de 4-6 pulgadas de largo, en la otra bandeja hacer circulitos de 2 pulgadas de anchos con la masa.

Hornear hasta que estén dorados, retirar del horno y dejar enfriar complemente.

Para la crema de chocolate calentar la crema hasta que forme pequeñas bolitas alrededor de la olla (no hervir), echar sobre el chocolate y dejar que se asiente por 5 minutos. Batir hasta que se vuelva cremoso.

Cuando estés listo para armar los Eclairs, llenar una manga pastelera con una punta mediana-pequeña, rellenar cada uno hasta que se sienta un poco más pesado, sumergir la parte de arriba en el ganache de chocolate.

Dejar que se asienten por unos minutos luego servir y disfrutar!

Patricia Pink n Hot Chocolate

Birthday Celebration and Themes.

Hey guys, just wanted to show you some pictures of my Birthday Party and talk a little on how I come up with themes for parties and how to work with it. This year I had no theme at first, I was just thinking I wanted a pretty cake and pretty nails; yes my priorities are special ha! Ha!. This is what happened, I went to a crafts store that we have here and I saw these beautiful paper straws, held them in my hand and thought: I want to do something with these someday.

straws

That same night at home I thought – Marshmallow POPS- (Can you see the hearts in my eyes?) So I consulted Pinterest -of course- and got some ideas and techniques. So that’s how it all started; confetti… sprinkles… delicate pastel colors etc., etc.  I guess what I am trying to say is that inspiration comes in the weirdest most subtle ways.  You just have to go with it and let it flow.

The end result was beautiful.  I made 3 centerpieces using the Marshmallow Pops and I didn’t even miss the whole balloon arrangement thingy, the cake was elegant and beautiful, it was extra tall, light pink and I used the same sprinkles that I used on the Marshmallow Pops, I even got a manicure that matched the decoration.  Anyone else match their nails to the decor? Or is it just me ;).

It was a wonderful night with my family, friends and my hubby, I am so glad I can share it with you all!!

Here are some pictures below, excuse the quality of the pictures and the lighting.

IMG_20140731_000917 Pop

Bday Gift

popss

 Click the picture for the “how to”

Patricia Pink n Hot Chocolate

Chocolate Cake

Guys..

This is a must!

Not only is it beautiful, it’s also delicious, luscious, not too sweet but just perfect. I love chocolate cake in any form, for me right out of the oven without icing is perfection. This version makes a great celebration cake for any occasion.  It’s easy to make, and results are always perfection.

Is this “The” perfect chocolate cake…?

Maybe!

Enjoy 😉

Decadent Chocolate CakeServes 1 (if you’re greedy), 8 or 10 depending how big you cut the pieces.

Ingredients for Cake:

  • 1-3/4 cups all-purpose flour
  • 1/2 cups sugar
  • 3/4 cup Unsweetened Cocoa
  • 1-1/2 teaspoons baking powder
  • 1-1/2 teaspoons baking soda
  • 1 teaspoon salt
  • 2 eggs
  • 1 cup milk
  • 1/2 cup vegetable oil
  • 1 tablespoon vanilla extract
  • 1 cup boiling water
Ingredients for Ganache:
  • 1 12 oz Bag of Semi Sweet Chocolate Chips
  • 1 1/3 Cup of Heavy Cream
Preparation:
Ganache:
Bring the cream to a simmer and pour over the chocolate chips. Allow to sit for 5 minutes without touching it. Then whisk until creamy, cover and set aside for 2 hours. If you house is warm -like mine- pop in the fridge for 15 minutes to help it set.
Cake:
Pre-heat oven to 350°F, grease and place parchment paper in bottoms of two 9 inch round pans.
In a bowl mix all your dry ingredients together. In a separate bowl mix your wet ingredients together. Combine and mix for 1-2 minuted by hand. Slowly stir in bowling water, don’t worry that the batter is thin, it works! Pour batter into prepared pans and voila!
Bake for 30 minutes or until wooden stick inserted in the middle comes out clean. When its ready set aside to cool. Once cooled, level with a knife and start frosting.
Enjoy!

Ingredients

Mix

prepare the pansPlease ignore my very old pans.

Ganache

Ganache2

prepare

Now.. as you can see they weren’t perfectly leveled, IT DOES NOT MATTER guys, make it work! I placed mine so that thinnest part was pared with the thickest part of the other cake, does that make sense? 

If it worked for me, it will work for you.

Como pueden ver, los bizcochos no me quedaron perfectamente nivelados, pero eso no importa, no tiene que ser perfecto. Simplemente hice que encajara el lado mas grueso con el mas fino debajo y listo. Nadie lo sabrá jaja.

glaze

TIP: Before frosting, place for pieces of parchment paper under the cake, this way when you are done make a mess (i’m messy) you can just carefully remove the parchment paper and your plate, or cake stand will be neat and pretty, no smudges. (Thanks Martha Stewart!)

TIP: Antes de glasear, coloca 4 pedazos del papel encerado debajo del bizcocho, de esta forma podrás glasear sin miedo a que se embarre el plato de servir el bizcocho, si ustedes son como yo que hago mucho desastre glaseando con chocolate jeje. cuando terminen de glasear remuevan CON CUIDADO el papel encerado y les quedara un plato limpio. (Gracias Martha Stewart)

Chocolate Cake

Cake!

Piece of Cake

So many pictures!!

***

Bizcocho de Chocolate Decadente – Sirve 1 (si te lo comes todo tu), 8 o 10 dependiendo del tamaño de los pedazos.

Ingredientes para el Bizcocho:

  • 1-3/4 taza de Harina.
  • 1/2 taza de Azúcar.
  • 3/4 taza de Cocoa Amarga
  • 1-1/2 cucharadita de polvo de hornear
  • 1-1/2 cucharadita de baking soda (como se dice eso en español???)
  • 1 cucharadita de sal
  • 2 huevos
  • 1 taza de leche
  • 1/2 taza de aceite vegetal
  • 1 cucharada de extracto de vainilla
  • 1 taza de agua hirviendo
Ingredients para el Ganache (glaseado)
  • 1 funda de 12 oz de Chispas de Chocolate Semi Dulce
  • 1 1/3 Crema de Leche
Preparación:
Ganache:
Calentar la leche hasta que se formen bolitas pequeñas en el borde la la ollita, no hervir. Verter encima de las chispas de chocolate. Dejar ahi sin tocar o mover por 5 minutos, luego batir hasta que este cremoso y tapar y dejar que repose por 2 horas, si en su casa hace mucho calor (como ahora en RD que nos estamos quemando) entre la mezcla de la crema chocolatosa en la nevera por unos 15 minutos para ayudarlo a que se vuelva firme.
Bizcocho:
Pre- cliente el horno a 350°F.  Engrase los moldes redondos de 9 pulgadas en los lados y la parte de abajo con mantequilla. Cubra el fondo con papel encerado.
En un bol mezcle todos los ingredientes secos, en otro los mojados. Luego mezcle todo batiendo con la mano por 1 o dos minutos consistentemente. Vierta la taza de agua hirviendo y no se preocupe que la mezcla se ve tan liquida, va a funcionar. 🙂
Vierta la mezcla en los dos moldes y hornee por 30 minutos o hasta que al insertar un palillo en el centro este salga limpio.
Dejar enfriar antes de glasear. Cuando este frió nivelelo un poco con un cuchillo (cómase los pedacitos que corto), luego a glasear.
A disfrutar!

Patricia Pink n Hot Chocolate

Perfect Brownies

Guys…

These brownies are sinfully delicious. They have the perfect balance of sweetness and chocolaty greatness. Indulge this weekend and bake them for a loved one. Simple to make and fast, I enjoy them warm, either fresh right of the oven or with 25 seconds of the microwave with a scoop of ice cream, but that is just me.

I made these for my co-workers to celebrate Saint Valentine´s Day and it was a success!!

I hope you enjoy this recipe. Please let me know in the comments below what goodies you made for v-day.

Ingredients

ButterChocolateBrownieHeart ShapedClose Up

Perfect Brownies

Ingredientes

  • 1 1/4 sticks unsalted butter
  • 1 1/2 cups sugar
  • 3/4 cup plus 2 tablespoons unsweetened cocoa powder
  • 1/4 teaspoon salt
  • 1 teaspoon Vanilla Extract
  • 2 cold large eggs
  • 3/4 cup all-purpose flour

Preparation

Preheat your oven to 325°F. Line the bottom and the sides of an 8-inch baking pan (round or square) with parchment paper, then lightly grease, leaving an overhang on opposite sides, this is to help you lift the brownies when they are done.

In a medium sauce pan melt the butter, then add the cocoa, sugar, and salt on very low heat; Don´t forget to stir the butter and cocoa mixture from time to time until everything is incorporated, it may look thick but don’t worry. Allow this to cool down until it’s warm.

Now in a bowl place the chocolate mixture and stir in the vanilla extract, add the eggs and mix well until the batter looks shiny and thick. Add the flour until it is well mixed together, stir with a wodden spoon for 1 minute without stopping. You are ready! Spread your batter evenly in the pan and bake until the skewer inserted in the middle of the batter comes out slightly moist and the crust is shiny.

Let them cool completely then cut and serve. I cut mine into hearts, and the scraps magically disappeared (not really, I ate them).

Enjoy guys!!!!

Brownies Perfectos

Ingredientes

  • 1 1/4 Barras de Mantequilla sin sal
  • 1 1/2 tazas de Azúcar
  • 3/4 tazas + 2 cucharadas de cocoa amargo en polvo
  • 1/4 cucharadita de Sal
  • 1 cucharadita de extracto de Vainilla
  • 2 huevos grandes fríos
  • 3/4 tazas harina

Preparación

Pre calentar el horno a 325°F. Forrar la parte de abajo del pyrex o molde (8 pulgadas, redondo o cuadrado) de hornear con papel encerado, luego engrasar levemente el papel. Añadir un pedazo rectangular que sobresalga debajo del circular para poder usarlo como ayuda al sacar el brownie cuando este listo.

En una olla pequeña, derretir la mantequilla, agregar la cocoa en polvo, el azúcar y la sal en un fuego muy bajo. Cuando esté todo muy bien incorporado remover del fuego. Va a estar espeso y grueso pero no se preocupen. Dejar que esto se refresque hasta que esté tibio.

En un bowl agregar la mezcla del chocolate, la vainilla y los huevos y mezclar hasta que este todo incorporado. Luego mezclar la harina hasta que desaparezca en la masa, cuando la harina ya no se vea batir por 1 minuto sin parar y está listo.

Verter la masa en el molde y emparejar con la parte de atrás de la espátula, hornear hasta que el palillo insertado en el centro salga medio húmedo pero no líquido y la superficie tenga brillo

Dejar enfriar completamente antes de cortarlos. Yo corté los míos en forma de corazón y los restos se desaparecieron mágicamente (me los comí).

Espero que lo disfruten. Dejenme saber en los comentarios debajo que postres o platos hicieron para San Valentin.

Signature

Super Flaky Hand Pies

Receta en Español debajo

Who doesn’t like Hand Pies?, I mean common people! No mess, no fuss and just the perfect serving in your hand. So since we all love Hand Pies I will be sharing my recipe today. These pies cooled down and wrapped in pretty parchment paper make great gifts also. The crust is flaky, not too salty just perfect! The secret is that both the butter and the water must be almost frozen, it works every time, trust me.

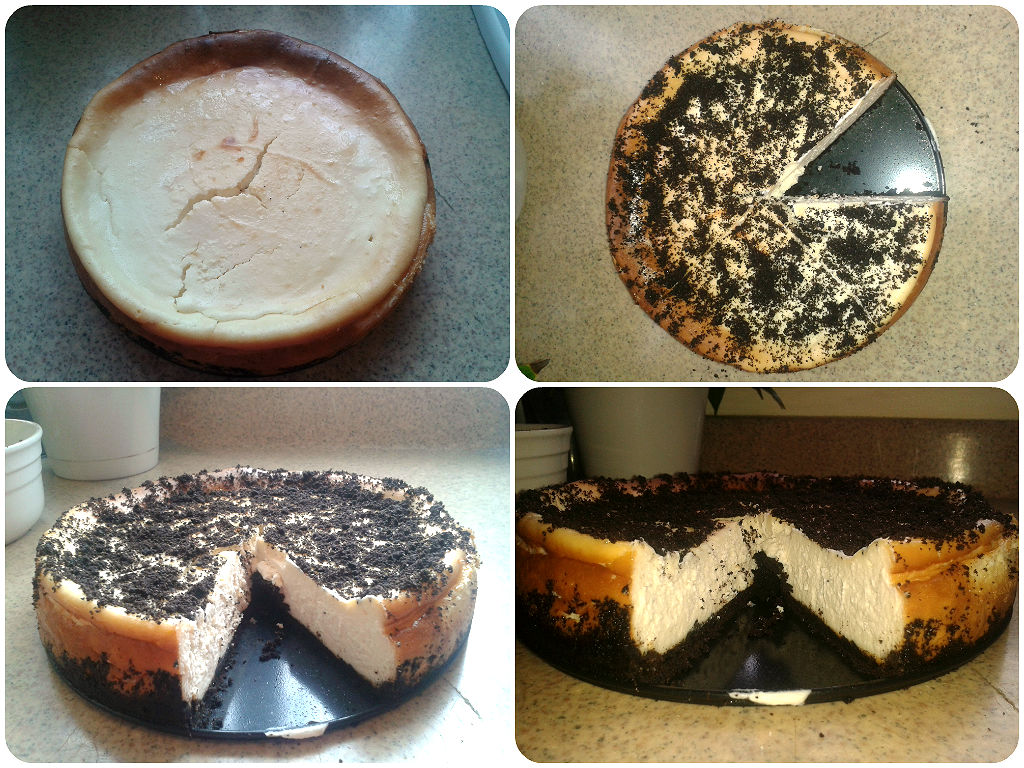
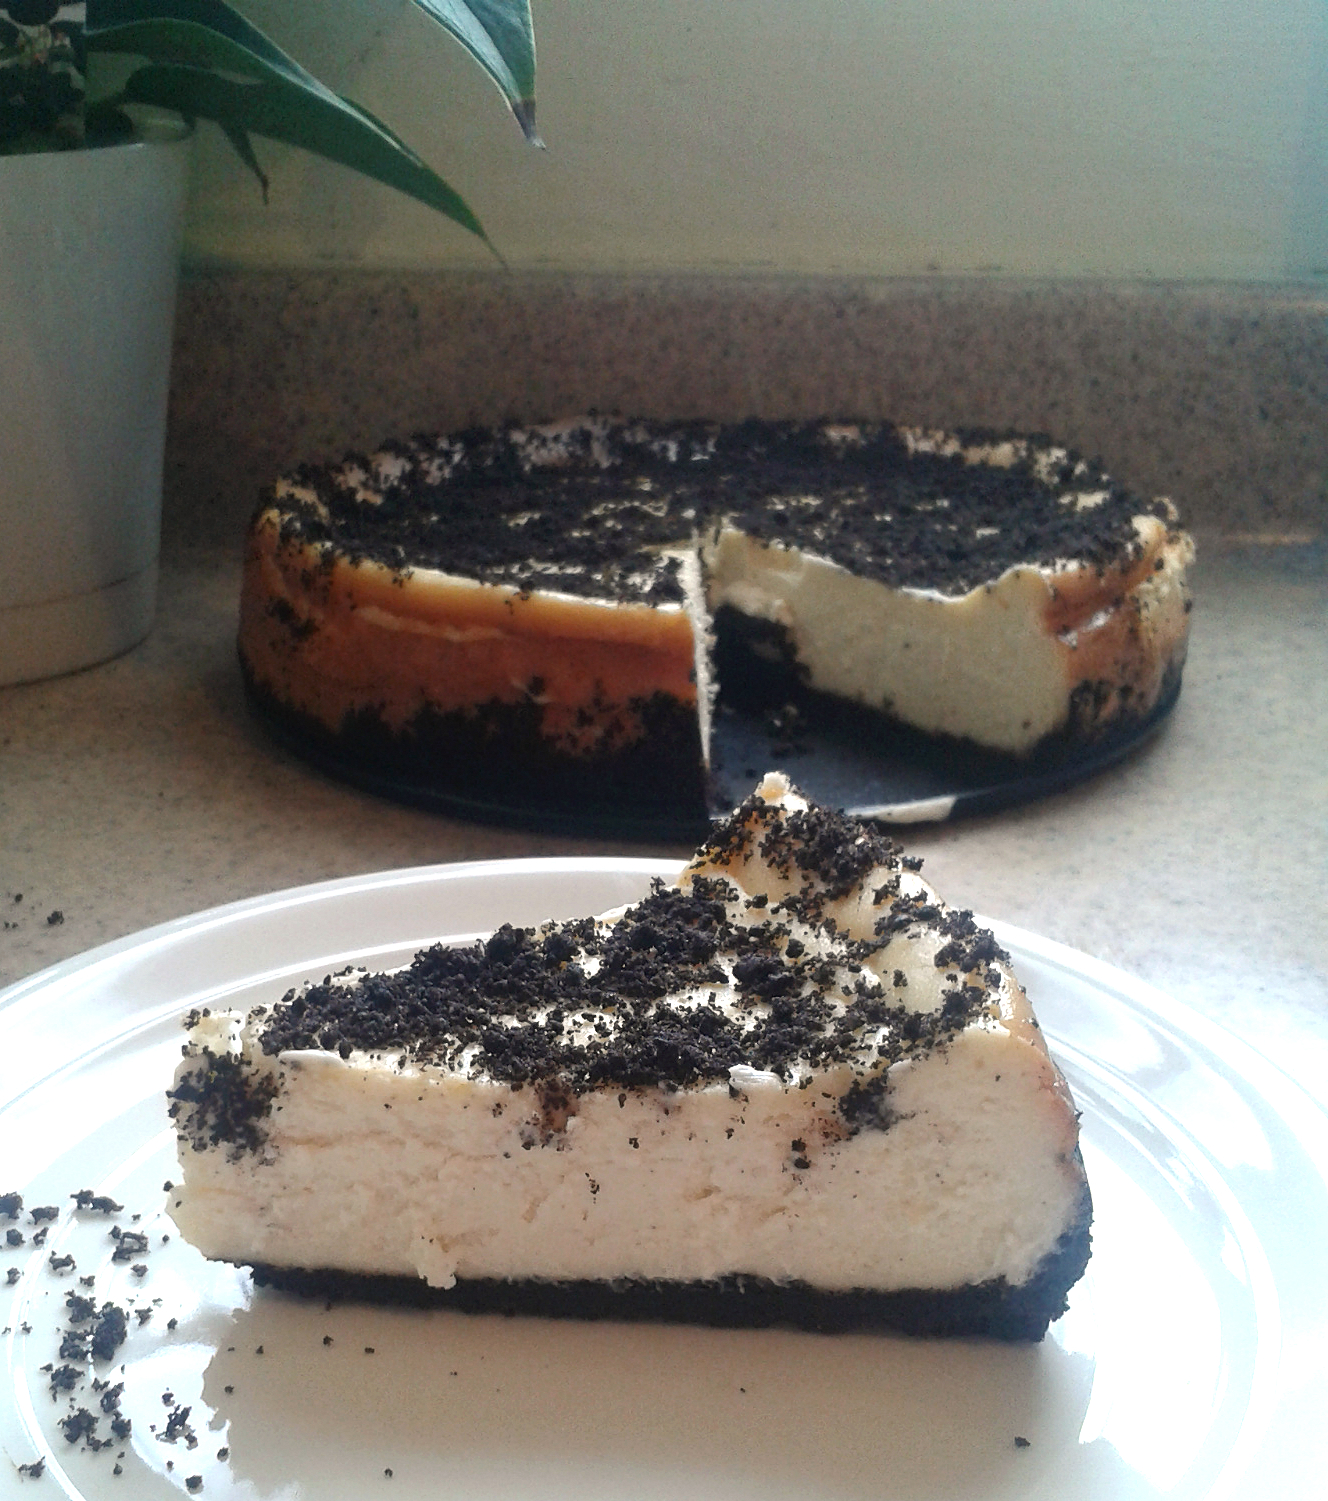
For these I am using my very own homemade Strawberry Marmalade and Faux Chocolate S’mores (Faux because I didn’t have graham crackers). You can use any canned pie filling or fresh fruit will do the trick as well. Enjoy!

Hand Pies

Super Flaky Pie Crust – Yield Two 9 inch pie crusts or 8-10 Hand pies

Ingredients

  • 2 1/2 Cups of all-purpose flour
  • 1/2 Teaspoon of Salt
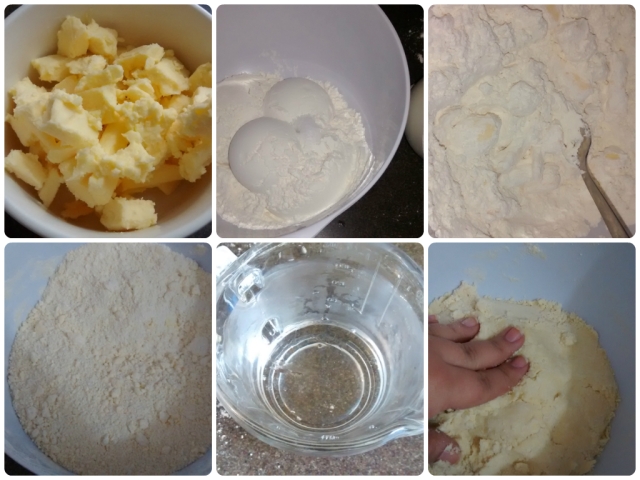
  • 1 Cup of Unsalted Butter  (chilled, diced and chilled again)
  • 1/2  Cup Ice Cold Water

Preparation

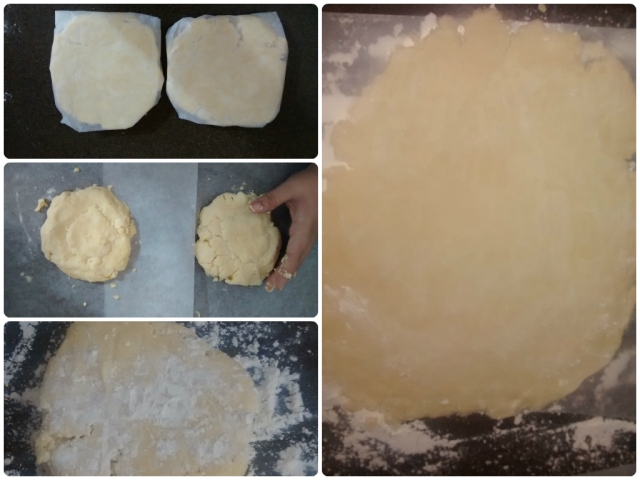
First dice the chilled unsalted butter ( two sticks), place in the freezer. Measure 1/2 cup of water and place in the freezer as well. Place flour and salt in a big bowl, mix, then add the butter and use a pastry cutter, two knives or a fork to mix in the butter until you have small crumbs. By now your water must have started to freeze and this is great, those ice crystals will help maintain the dough cold. Add the water one tablespoon at a time until the dough can be formed into a crumbly ball, I used about 6 tablespoons but this depends on the humidity in your country. Divide dough into two balls or disks – I know it’s really crumbly, don’t worry.. trust me -, wrap in parchment paper or plastic wrap and pop into the freezer for 1-4 hours.

To use (for pies or hand pies) take the dough out of the freezer, allow to thaw for at least 10 minutes and roll to about 1/4 of an inch to a heavy floured counter top or to heavy floured parchment paper. This dough makes two 9 inch pie crusts or 8-10 Hand pies.

To make the hand pies:

  • Super Flaky Pie Crust Dough
  • 1 Egg, beaten
  • 1/2 Tablespoon Sugar
  • Pie filling, Jam, Marmalade, Semi Chocolate Chips, Nutella, Marshmallows or fresh fruits.

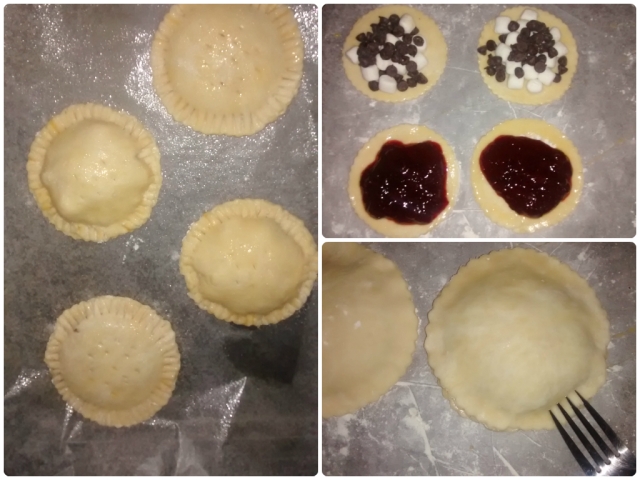
Pre-heat the oven to 350 f. After rolling out the dough to 1/4 of an inch on to a heavy floured surface, cut into 4 inch circles or squares, I was able to cut 10 pies (20 sides). On one side use the egg wash on the edges of the circles, place filling in the middle about 1 1/2 tablespoons, place the other side of the pie on top and seal by pressing with your finger and then pressing the edges with the fork  to create small creases. Brush with the beaten egg and sprinkle with sugar.

Place on a non stick pan or a regular pan with greased parchment  paper.

Bake for 15-25 minutes or until golden brown.

Flaky Pie Crust

Flaky Pie Crust 2

Pies

Cool down and enjoy with a scoop of vanilla ice cream.
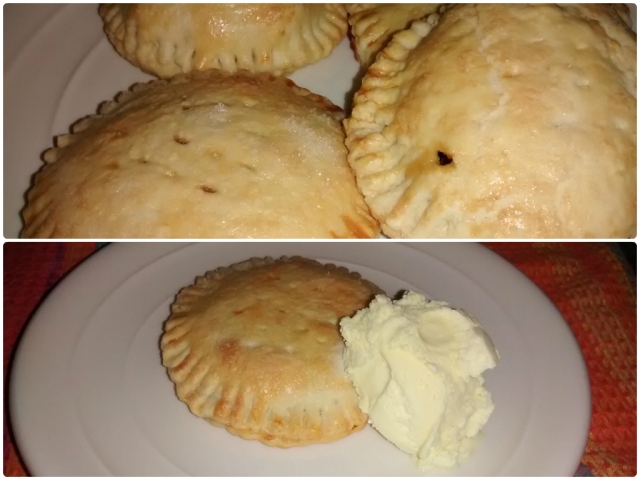
Pies2

Delish!!

Masa para Pies – Da para dos masas de 9 pulgadas o para 8-10 mini pies.

Ingredientes

  • 2 1/2 Tazas de Harina
  • 1/2 Cucharadita de Sal
  • 1 Taza de Mantequilla sin sal (cortada en pedazos y fría casi congelada)
  • 1/2  Taza de Agua casi congelada

Preparación

Primero cortar la mantequilla en cuadritos y enfriar en el freezer. Medir 1/2 taza de agua fría y colocar en el freezer también. Mientras en un bowl colocar la harina y la sal, mezclar. Luego retirar la mantequilla de la nevera y con un tenedor mezclarla en la harina (como si estuviera majando papa, desbaratando la mantequilla en la harina con el tenedor).

Cuando este la mezcla con grumos pequeños sacar el agua del freezer (si tiene pedacitos de hielo mejor, esos pedacitos de hielo van a mantener la masa fría). El agua se va mezclando una cucharada a la vez. Cuando la masa se pueda hacer una bola con la presión de la mano y se mantenga, ya no agregar más agua.

Dividir la masa en dos y formar dos discos, envolver con papel encerado o plástico y enfriar de 1-3 horas.Aunque la masa se vea muy boronosa si coge la forma con la mano y se amolda esta perfecta. Luego de que la enfríes podrás amasarla bien. No te preocupes. 

Cuando la mermelada este fría se pueden hacer los mini pies. Sacar la masa del freezer, dejar que se aclimate como 10-15 minutos.

Enharina la superficie con mucha harina para que no se pegue y el rodillo también, usando el rodillo aplanar como a 1/4 de pulgada de grueso, si se rompe, pegar con los dedos sin problemas.

Para hacer los mini pies:

-Masa para pies lista
-1 Huevo batido
-1/2 cucharada de azucar
-Mermelada o relleno.

Pre-Calentar el horno a 350f. Corta la masa con la figura deseada, la parte de abajo y la de arriba del pie. a la parte del abajo untar con el huevo batido las orillas, esto sera el pegamento.

Colocar como 2 cucharadas del relleno en el centro y sellar con la parte de arriba presionando hacia abajo en las orillas y sellando con un tenedor.

Con un tenedor hazle hoyitos pequeños arriba al pie para que salga el vapor, unta la parte de arriba con el huevo y espolvorea el azúcar.

Colocar en una bandeja engrasada levemente y hornear 15-25 minutos o hasta que estén dorados.

firma

Homemade Strawberry Marmalade

Receta en Español debajo.

So Valentines Day is coming up and if you are like me you love to make special gifts for special people in your life, it doesn’t matter if it’s family, your best friend, a great co-worker or your boyfriend or husband, it is so nice to show people how much we appreciate them  and Valentines Day is a great occasion.

I call this Strawberry Marmalade because of the consistency, I have to confess I don’t know how to make jam or jelly, and all those additives (pectin etc) confuse me… a lot. In my country we call this “mermelada” ( spanish) and the ingredients are as simple and natural as you can get them: fruit, water, sugar, that’s it, so I stick to this recipe and it works…wonderfully.

I hope you enjoy the recipe and let me apologize for the pictures, I don’t have a super fancy camera yet and the “natural lighting” in my house is non existent but I tried to capture the steps as best as I could. (promise i’ll get a better camera in the future)

Home Made Strawberry Marmalade – Yield 3 1/2 Cups

Ingredients

  • 1 – 2 Pound Package of Frozen Strawberries (Thawed)
  • 1/2 Tablespoon lemon Juice*
  • 2 Cups of sugar

Preparation

Allow strawberries to thaw for at least 10-15 minutes. Then place in a large sauce pan, add the lemon Juice and the sugar, stir and start cooking in high heat. After 10 minutes or when you see the strawberries soften, lower the heat to medium and using a good old potato masher, mash down the strawberries until they break down. Allow the marmalade to thicken for at least 10-15 more minutes, stirring occasionally.

Remove from pan, cool down, enjoy!

*Lemon juice preserves the pretty red color of the strawberries.

The marmalade can be stored in a sealed container in the fridge for about 1-2 months.

Strawberry Marmalade

That last picture was without flash, that is the “real” color but you get the picture 😉

IMG_20140208_204131992

Hope you guys love it as much as we do!!

Mermelada de Fresa Casera – Da para 3 1/2 tazas aprox.

Ingredientes:

  • 1 paquete de 2 libras de Fresas congeladas.
  • 1/2 Cucharadita de jugo de limón
  • 2 Tazas de Azúcar

Preparación:

Sacar las fresas del freezer y dejarlas a fuera por 15 minutos. Luego en una olla grande colocar las fresas, el azúcar y el limón, mover para que el azúcar macere a las fresas y comiencen a salir los jugos. Poner el fuego alto y cocinar hasta que se ablanden.

Cuando estén blanditas con un majador de papa o plátano majar las fresas para que se desbaraten. Mover y bajar el fuego. Moviendo cada 5 minutos permitir que se espese al espesor deseado por aproximadamente 15 minutos.Remover de la olla, dejar que se enfríe afuera y luego guardar y refrigerar.

La mermelada dura de 1-2 meses en la nevera en un recipiente herméticamente cerrado.
firma